Low stock alert
Email shoppers when a saved item is running low, and show a stock message on product pages, so they buy before it sells out.
Overview
Shoppers save items to buy later, then miss them when they sell out. The Low stock alert emails them while the item can still be bought, when only a few are left.
- Low stock email: sent when the option a shopper saved drops to the number you set, or fewer.
- Low stock message (optional): a line such as "Only 3 left in stock" under the price on product pages.
- Supported sending methods:
- Joy Wishlist built-in email: Joy Wishlist designs and sends the email. No other app needed.
- Marketing app: Klaviyo or Omnisend (coming soon) sends the email. Joy Wishlist tells it when.
- Wallet pass (with Joy Loyalty): pushes the alert to the shopper's Apple Wallet or Google Wallet pass, next to email or on its own.
Low stock alert is off by default. This page takes you through the whole setup, from choosing a sending method to testing the alert.
Before you start
- Make sure the Joy Wishlist app embed is on. On the Joy Wishlist home page, App embed should show Active. The low stock message also needs it.
- The alert only works for products that track inventory in Shopify. Products that keep selling when out of stock never get it.
How to set up
Open Notifications
From your Shopify admin, go to Apps > Joy Wishlist > Settings, then open the Notifications tab.
Choose a sending method
Pick who sends your alert emails. This choice applies to every alert.
- Joy Wishlist built-in email: Joy Wishlist designs and sends the emails. You don't need another app. Best for stores that don't use a marketing app, or want alerts running right away.
- Marketing app: a marketing app you already use, such as Klaviyo or Omnisend (coming soon), sends the emails. Best for stores that already send their emails from a marketing app and want wishlist alerts in the same place.
Choosing Marketing app? You still complete every step on the Notifications page. Joy Wishlist decides when each alert fires and passes it to your marketing app to send. So set up and turn on Low stock alert, and set the send schedule, the same as with built-in email. One thing changes on the page: the last step, Sender details, becomes Connect your marketing app. You then build the email flow in that app.
Wallet pass (optional): in the same section, turn on Also send to Wallet pass to push your alerts to shoppers' lock screens through their Apple Wallet or Google Wallet pass. Both need Joy Loyalty on the Advanced plan or higher. For the setup, see Wallet pass alerts.
Set up and turn on Low stock alert
Under Notification types, click Low stock alert.
- Trigger when: A shopper's saved variant drops to a number (default 5) or fewer left in stock.
- Optional: tick Don't send when only a number (default 1) or fewer are left. This keeps the alert off the last few units, so shoppers aren't sent to a page that's about to sell out. The number must be lower than your low stock threshold.
- Apply to: choose which products send this alert. See Apply to options.
- Low stock message (optional): turn it on to show a stock message on product pages in your scope, then click Customize. See Low stock message.
- Turn it on: switch the toggle at the top right to Enabled, then click Save in the top bar. No alerts go out until you do.
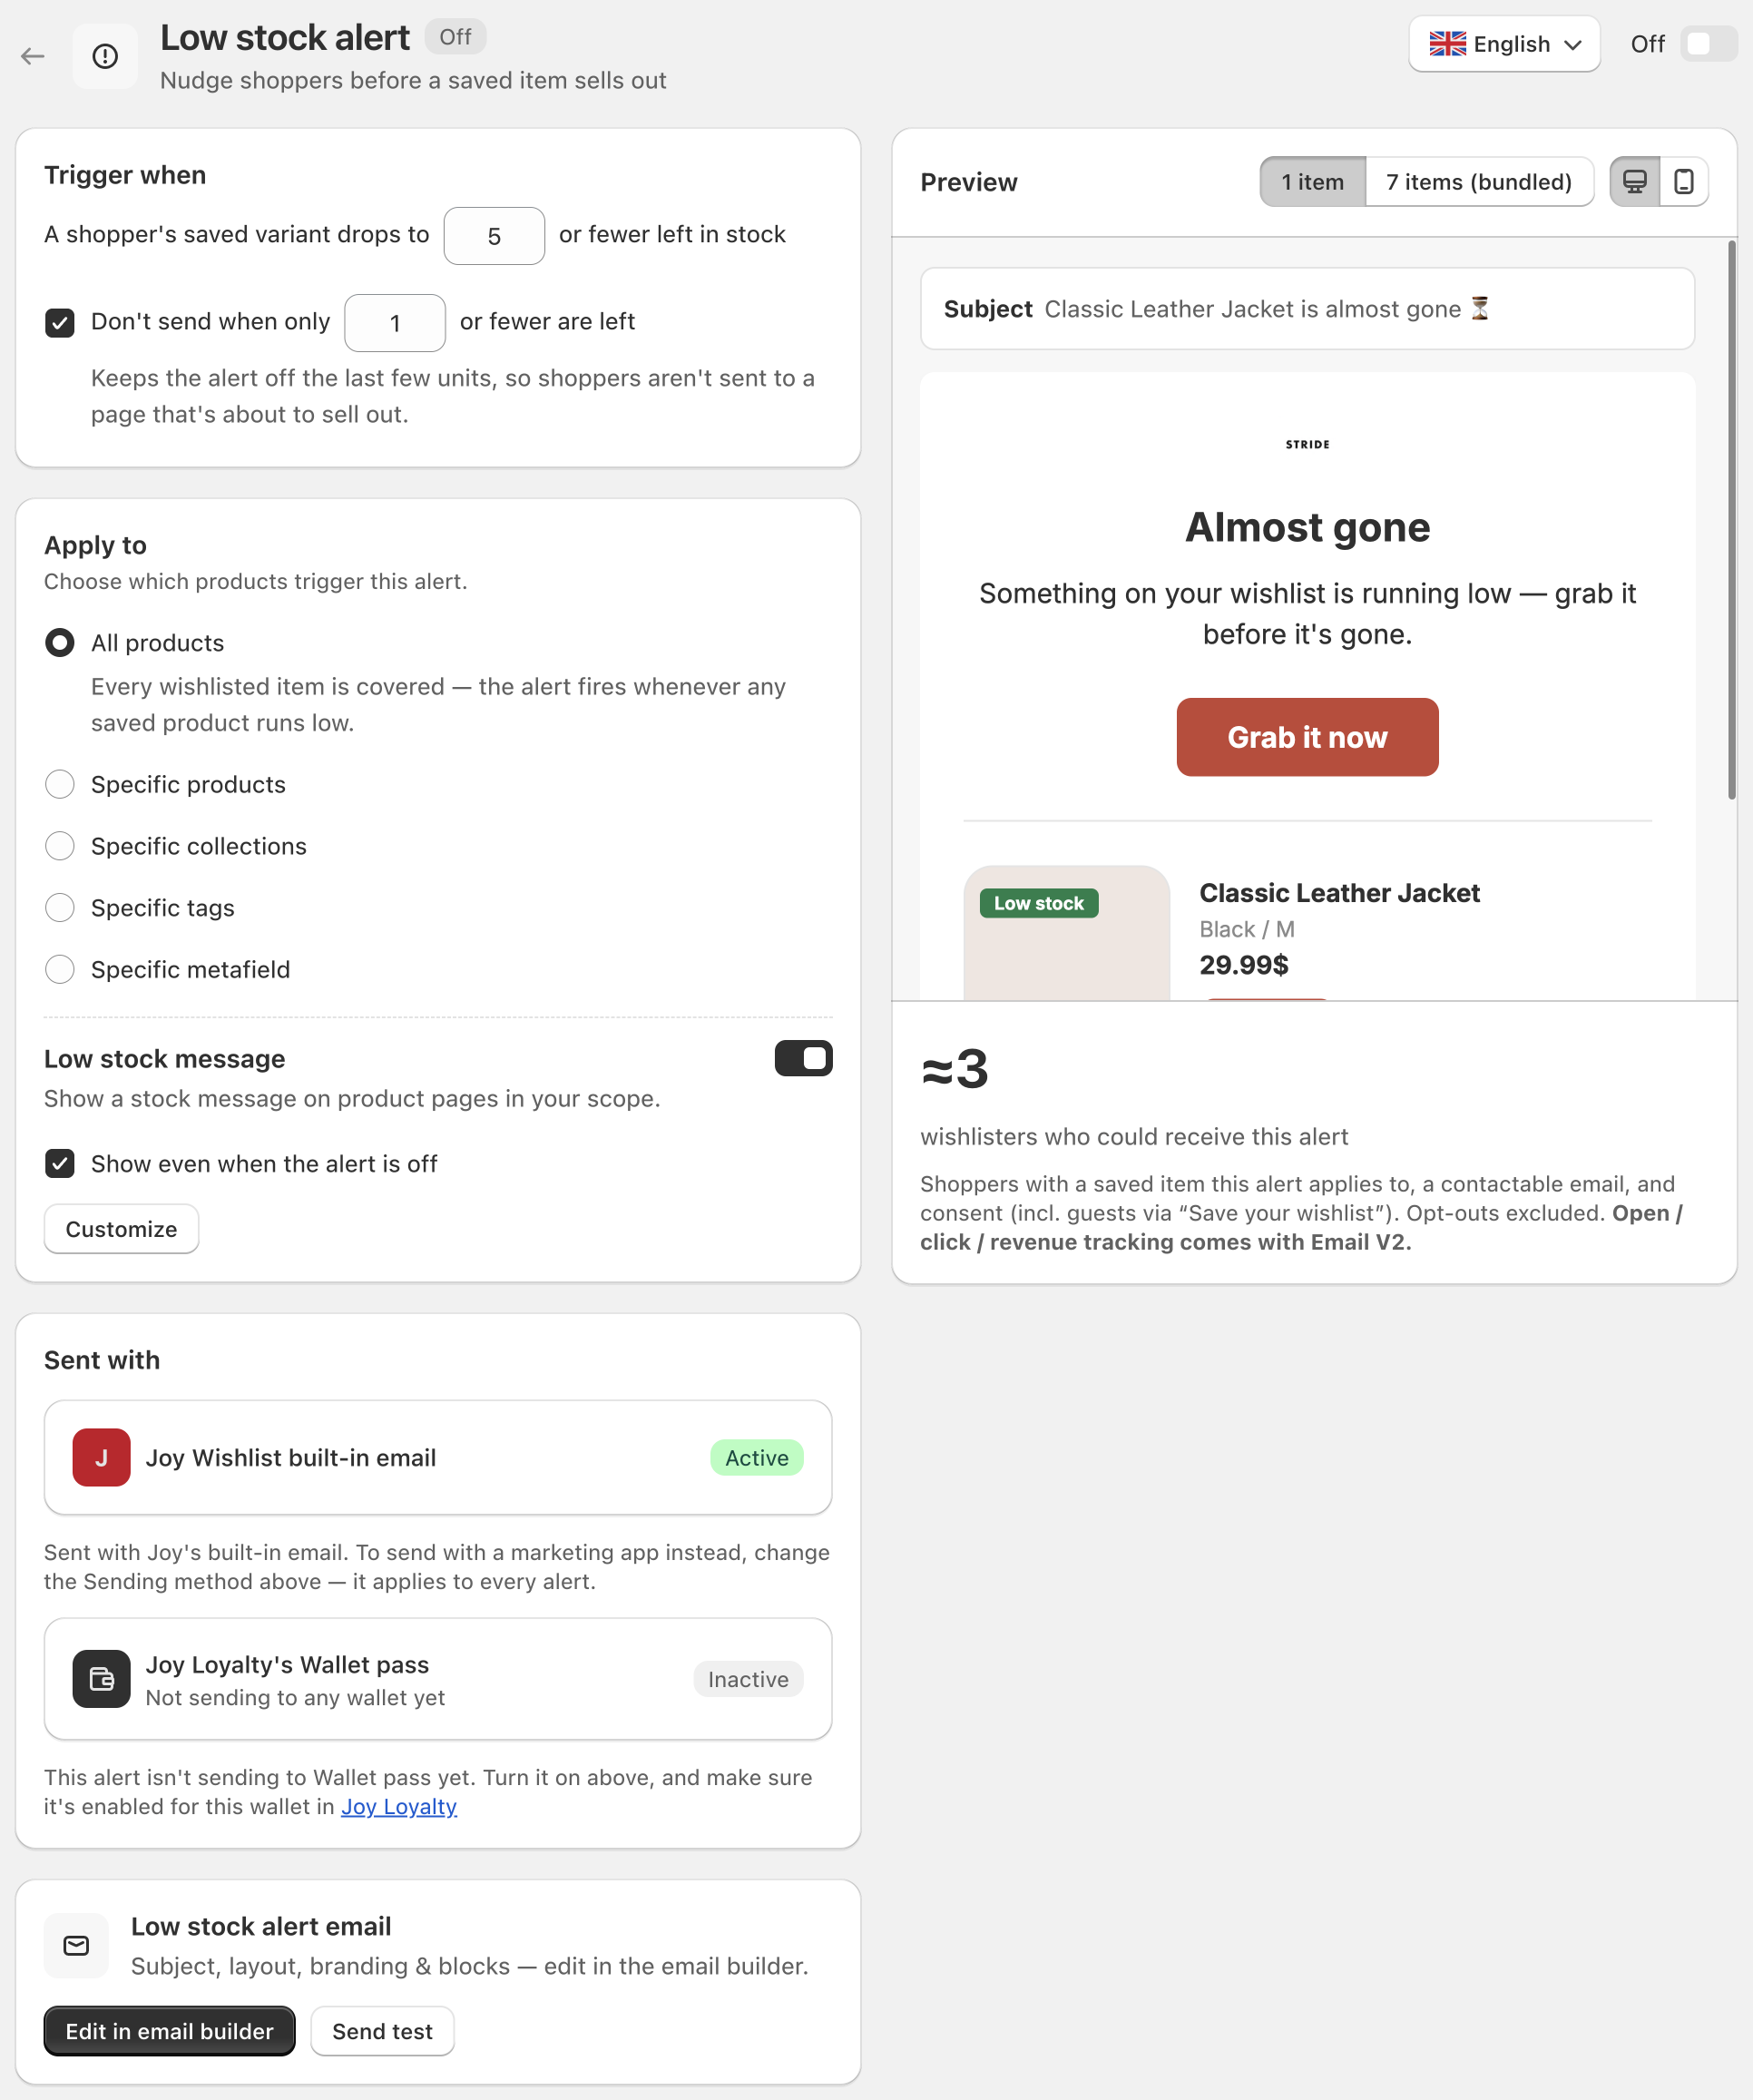
When you turn the alert on, or raise the threshold while it's on, Joy Wishlist checks your catalog. Saved items that are already low get the alert right away, so a large first send is normal.
Customize the email
In the Low stock alert email card, click Edit in email builder. Change the subject, banner, text and design, check the preview, and send yourself a test. See Email builder.
To show the number left in the email, tick Show how many are left under Stock count. The badge then reads Only {{qty}} left by default.
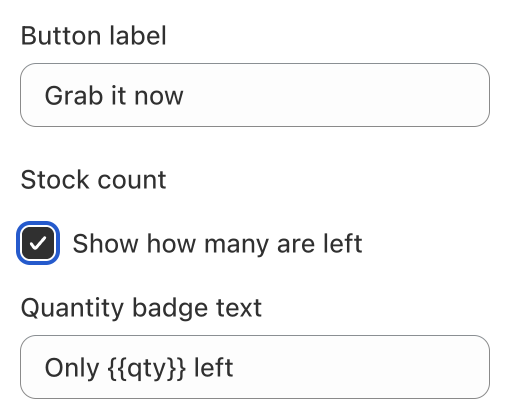
With Marketing app, you build the email flow in that app instead.
Set the send schedule
Back on the Notifications page, choose when emails go out. This applies to every alert.
- Send at a set time (default): once a day, around the time you pick (default 10:00), in each shopper's local time. Best for stores with deep stock, where a tidy daily email matters more than speed.
- Immediately: goes out as soon as an item runs low, after a short grouping window (default 10 minutes) that combines items into one email. Best for limited or fast-selling stock, when the last units can go within hours.
If we can't detect a shopper's time zone, emails follow your shop's time zone.
Set your sender details
Choose who the email comes from.
- Default: sends from
[email protected]under your store name. No setup needed. Best for starting right away, or if you don't have an email address on your own domain. - Custom: sends from your own email address, once you verify it and turn it on. Best for stores with their own email domain. Shoppers see your address in the inbox, which builds trust and improves deliverability.
For the full steps, see Sender details.
With Marketing app, this step is Connect your marketing app instead. Click Connect an app in Integrations and connect your app.
Test it yourself
Run one full test before you rely on it. You play the shopper, then the merchant, and watch the email arrive. It takes about 15 minutes.
Pick a test product
Choose a product option that is in your Apply to scope and tracks inventory. In Shopify, go to Products > Inventory and set that option above your threshold, for example 10.
Save it as a shopper
In Shopify, add a customer with an email you can check and set them to receive marketing emails. On your store, sign in as that customer, open the product, choose the test option, and save it to the wishlist.
Lower the stock
Back in Products > Inventory, set the option to a number at or below your threshold, for example 3, and click Save. Don't set it to 0: an item that sells out gets the Back in stock alert later, not a low stock alert.
Wait for the email
With Immediately, the email goes out when the grouping window ends (10 minutes by default). With Send at a set time, it goes out at the next send time.
Check Sending summary
On the Notifications page, open Sending summary. Low stock alert shows Sending under Email. If you turned on the low stock message, open the product page to see it under the price.
To test again with the same option, first raise its stock above your threshold. The alert fires once each time stock drops low.
If the email doesn't arrive, see Troubleshooting.
Reference
The steps above cover the full setup. This part goes deeper into the Low stock settings and what shoppers see.
Trigger settings
| Setting | Default | What it does |
|---|---|---|
| Low stock threshold | 5 | The alert fires when a saved option drops to this number or fewer. |
| Minimum stock | Off (1 when ticked) | No alert when only this number or fewer are left. Must be lower than the threshold. |
Stock is counted per option (variant), across the locations that fulfill online orders.
Apply to options
| Option | Sends the alert for |
|---|---|
| All products (default) | Every wishlisted item. The alert fires whenever any saved product runs low. |
| Specific products | Only the products you pick. |
| Specific collections | Products in the collections you pick. |
| Specific tags | Products with the tags you add. |
| Specific metafield | Products or variants where a true/false metafield has the value you pick. |
This selection is separate from the one in Back in stock.
Low stock message
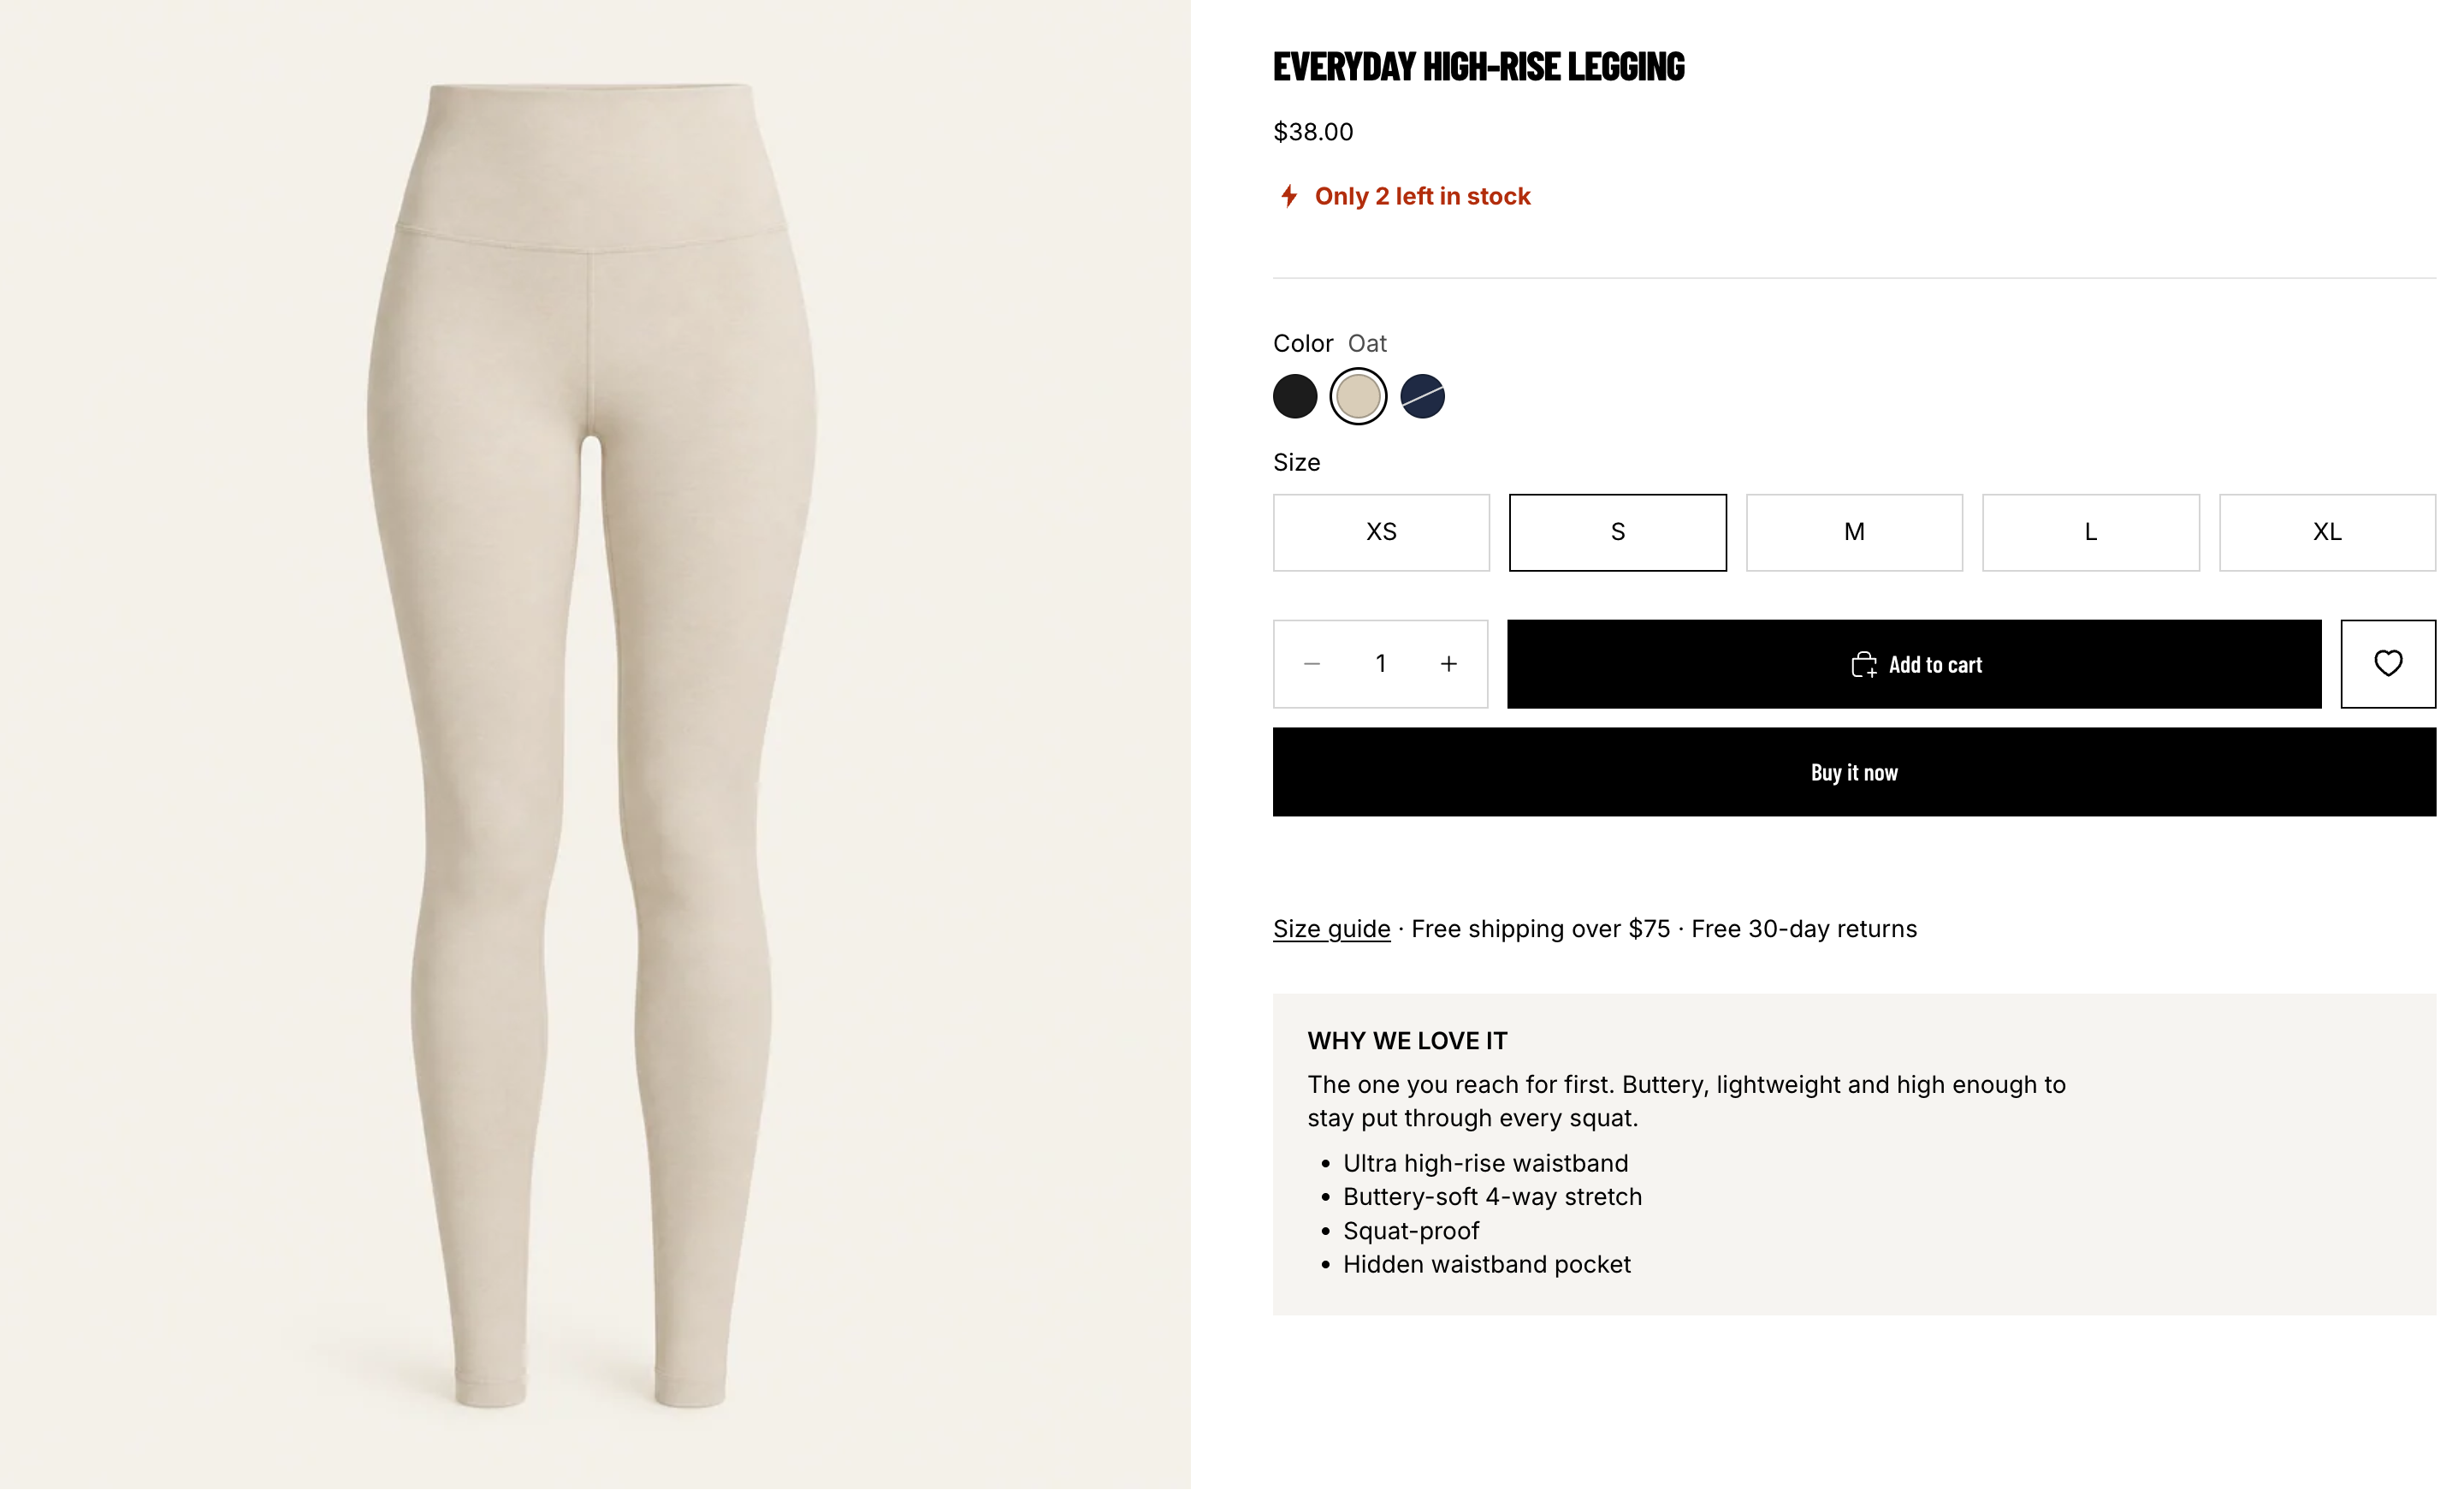
A line under the price on product pages, such as "Only 3 left in stock". It only shows on products in your Apply to scope.
The Customize window has two tabs, with a live preview:
- Settings: When to show. Pick When 5 or fewer are left (default, the same number as your alert trigger) or Always.
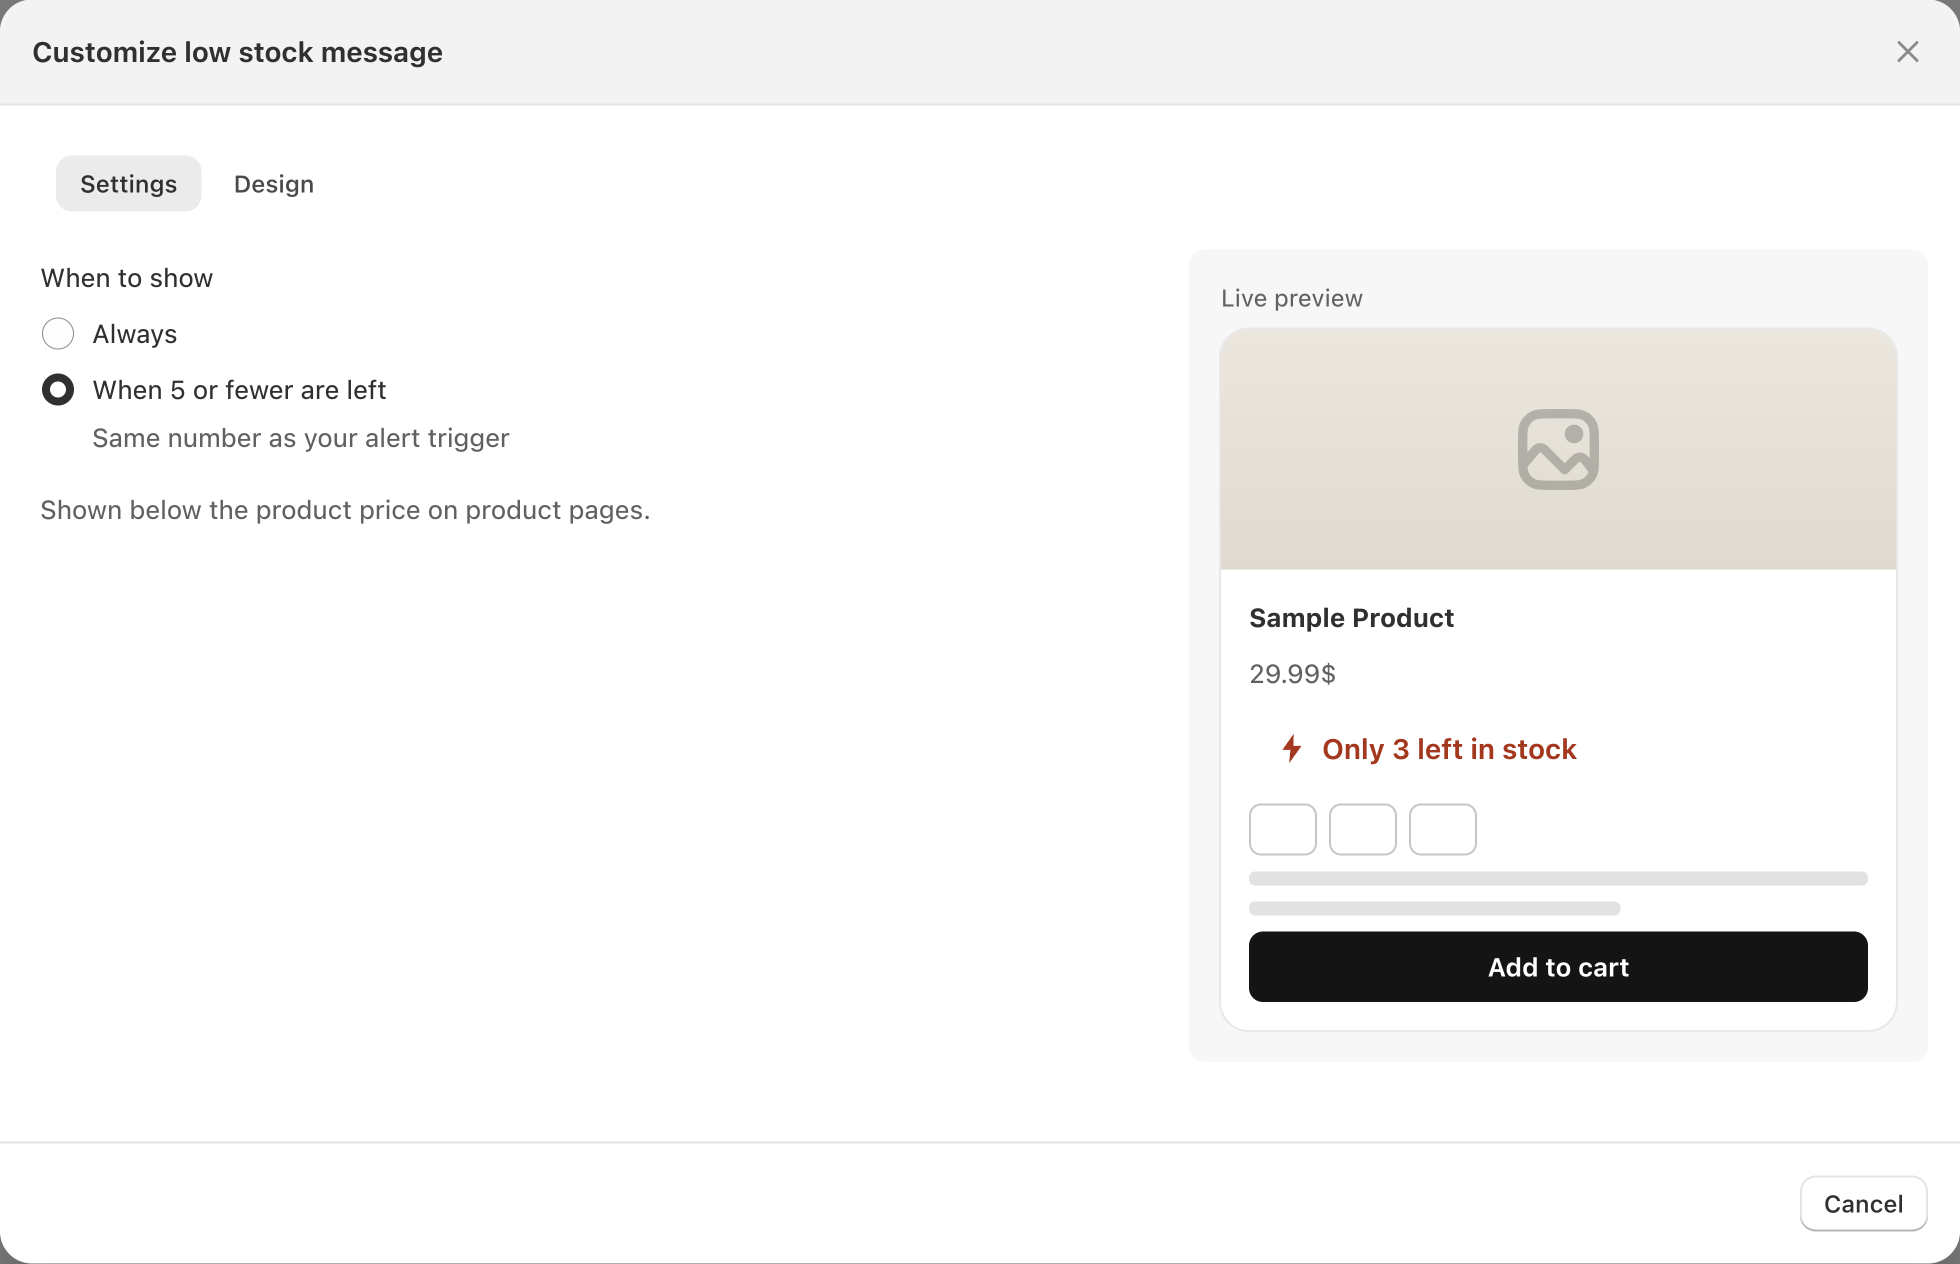
- Design: the Message (default "Only {{qty}} left in stock", where
{{qty}}shows how many are left), an Icon (None, Flame, Clock, Bolt or Bell), the style (Solid, Outline, Plain or Free form), colors and corner radius.
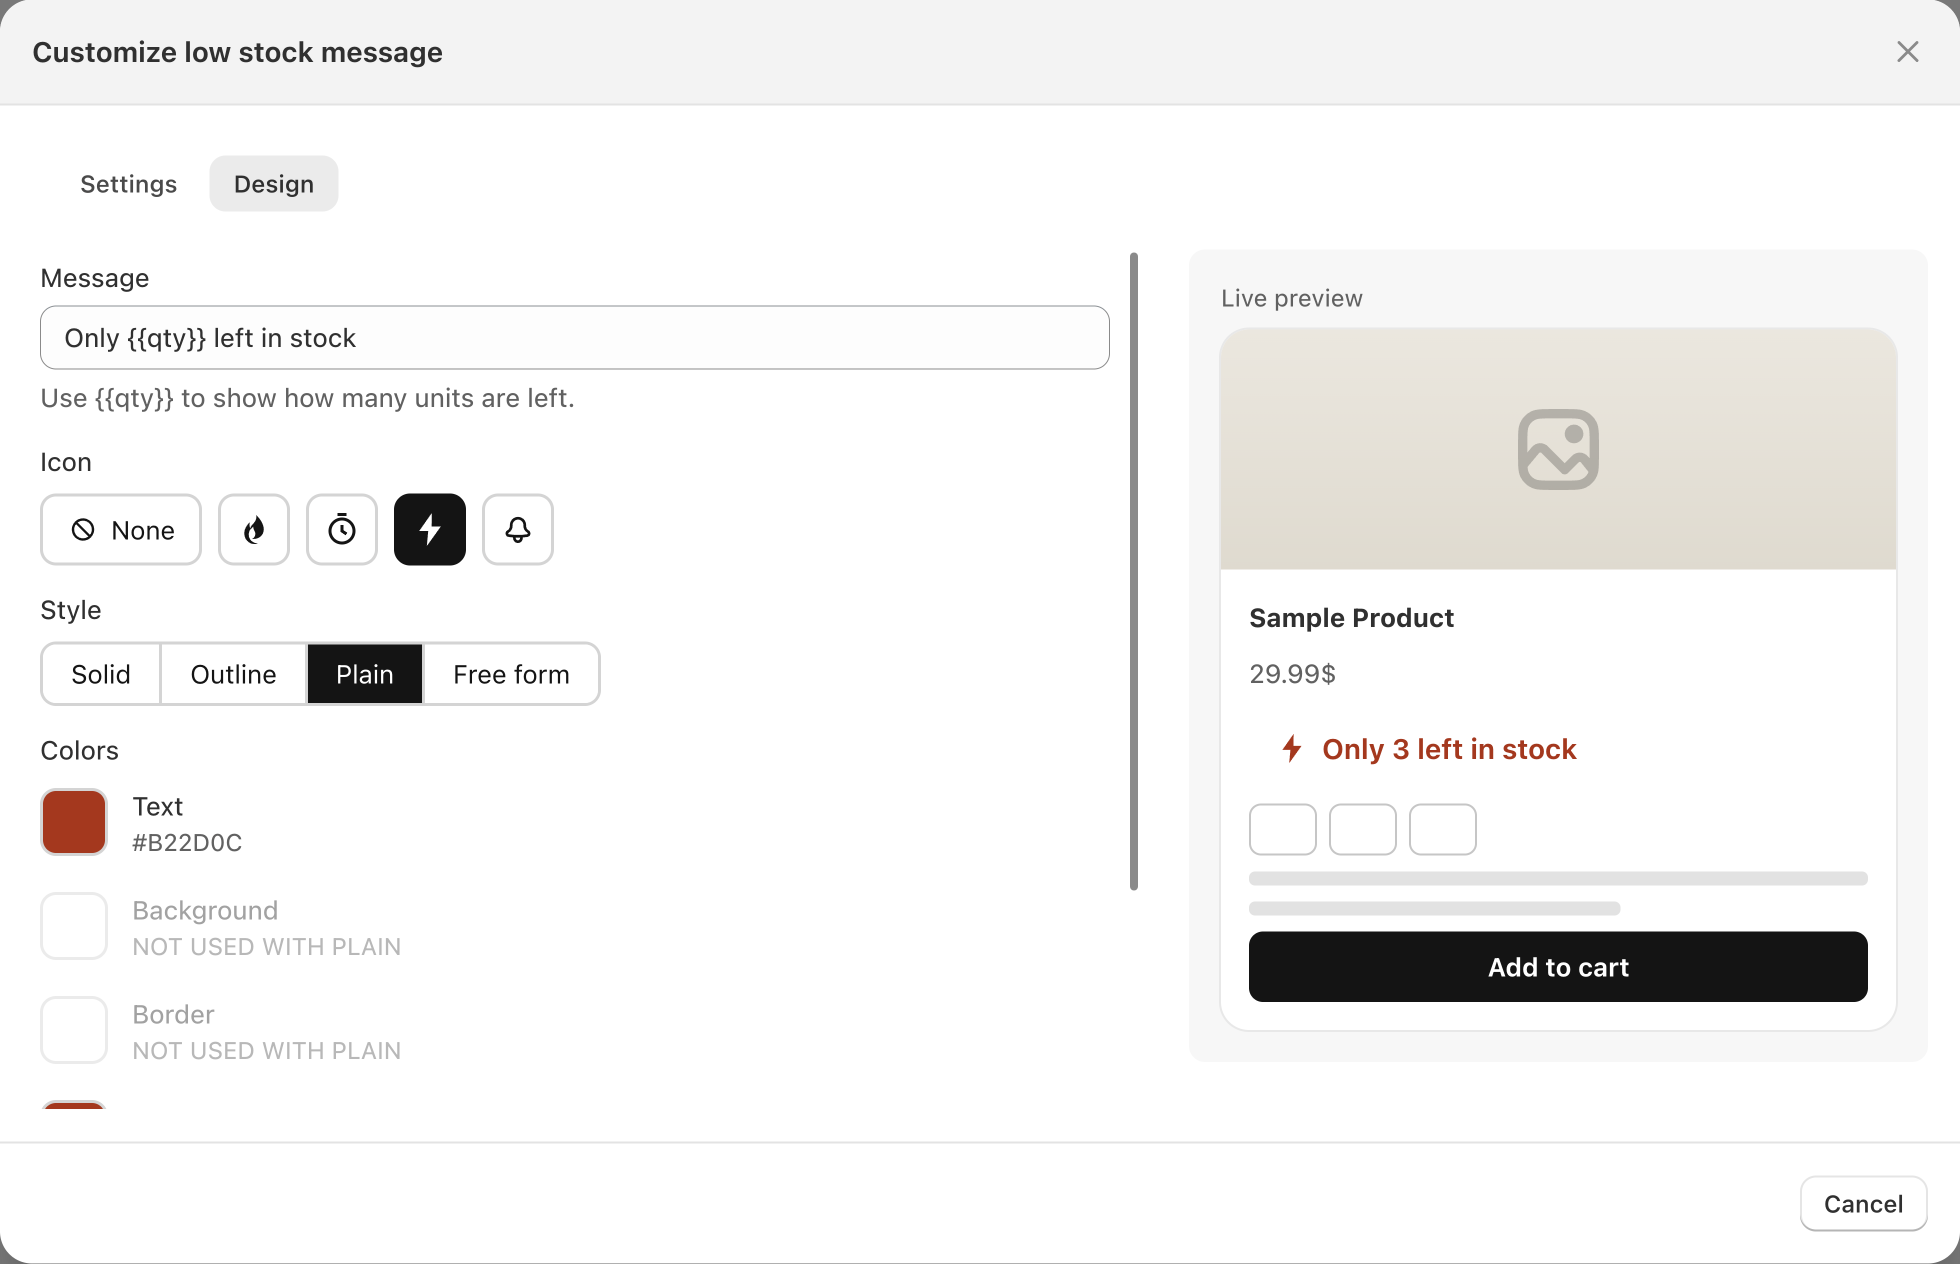
The Customize window has its own Save button. Click it before you close the window.
To show the message while the email alert is off, tick Show even when the alert is off.
The message is hidden when:
- The option is sold out.
- The product is outside your Apply to scope, or doesn't track inventory.
- When to show is set to a number and more than that are left.
- The alert is off and Show even when the alert is off isn't ticked.
The message is placed automatically under the product price by the Joy Wishlist app embed. It shows on product pages only, not in quick view or sticky add-to-cart bars. Whether it finds the price depends on your theme.
What shoppers see
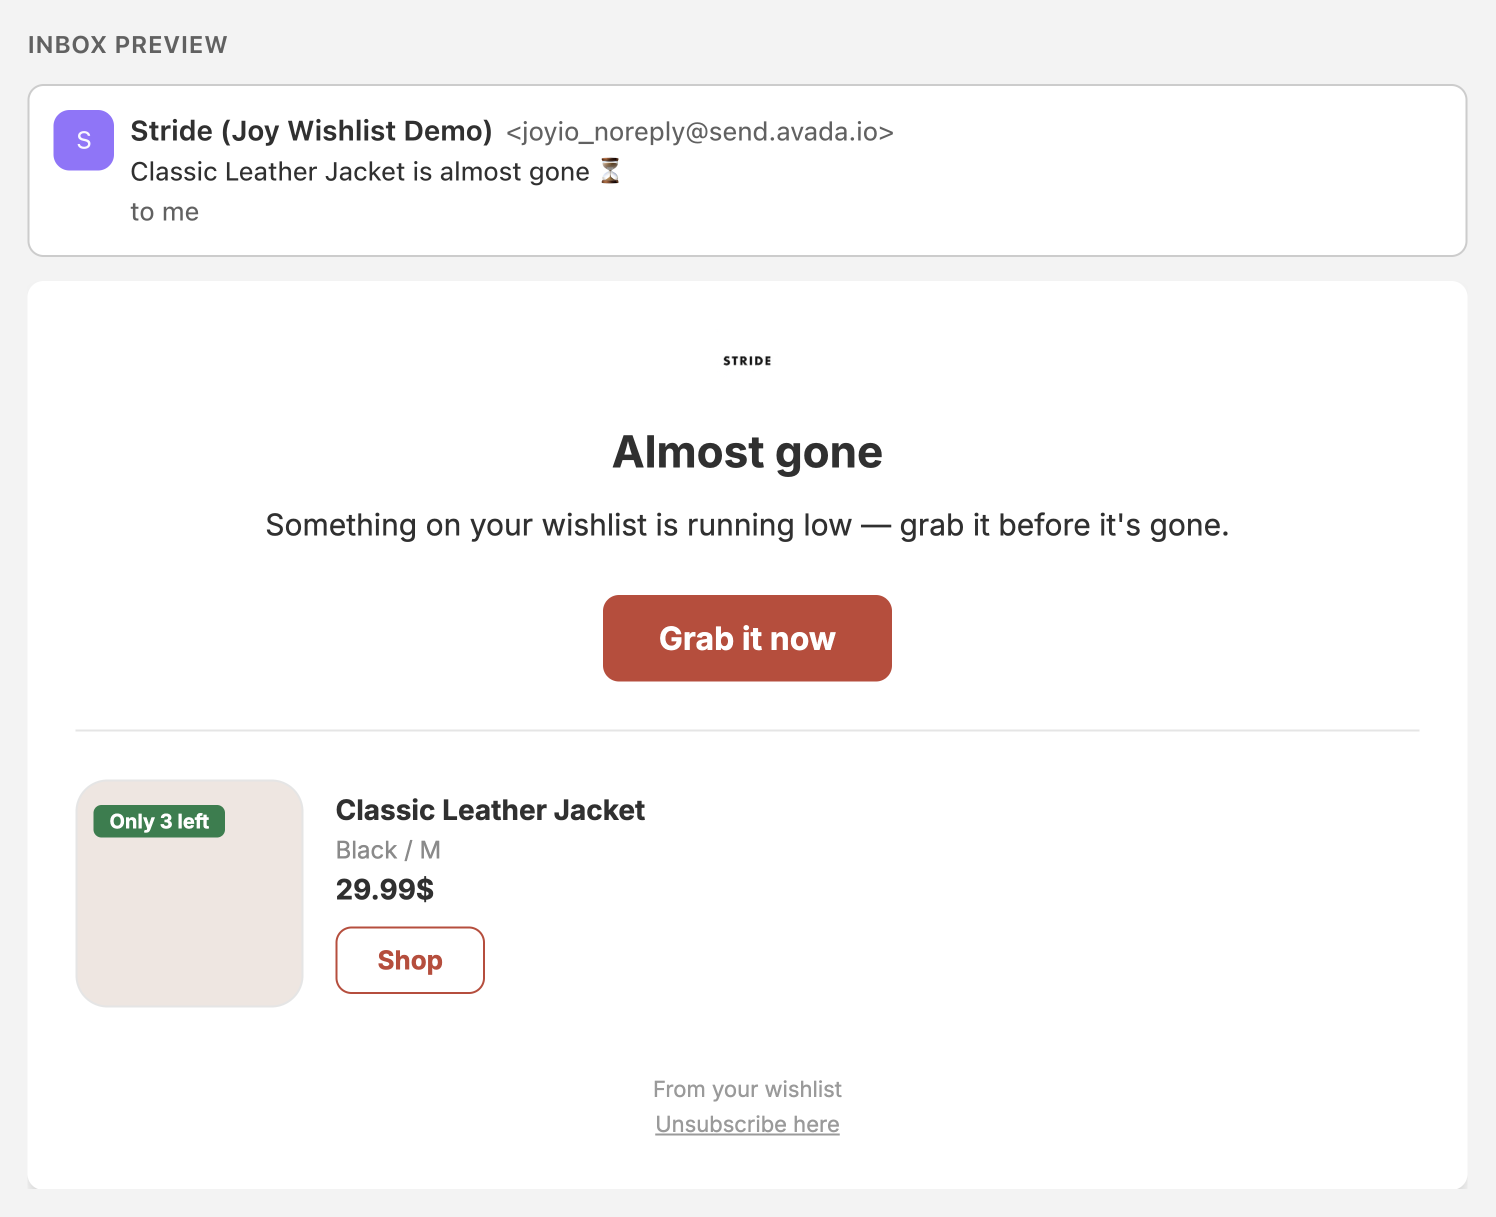
- The email: a Low stock badge on the product (or Only 3 left if you ticked Show how many are left), its current price, and a Grab it now button back to your store. If several saved items run low together, they're grouped into one email.
- On product pages: the low stock message, if you turned it on. It updates when the shopper switches options.
- Unsubscribe: every email has an Unsubscribe here link.
Good to know
- Off by default: no emails go out until you turn Low stock alert on and save.
- Once each time stock drops: an option sends one alert when it drops low. It can send again only after its stock goes back above the threshold.
- Checked again before sending: if the option sold out or was restocked above the threshold in the meantime, it's left out of the email.
- Straight to sold out: if stock goes from above the threshold straight to 0, there's no low stock alert. Shoppers get the Back in stock alert when it returns, if that alert is on.
- Saved option: the alert follows the option the shopper saved. Items saved without an option chosen don't get it.
- Marketing app: your app receives the number left, whatever you choose under Stock count. Wallet pass messages don't show the number.
FAQ
Q: I turned the alert on and many emails went out at once. Why?
A: When you turn the alert on, or raise the threshold while it's on, Joy Wishlist checks every saved item. Items already at or below the threshold get the alert right away. After that, each option sends only when it drops low again.
Q: Stock went from 10 to 0 and no one got a low stock alert. Is that right?
A: Yes. The low stock alert is for items shoppers can still buy. Once an item sells out, the Back in stock alert takes over.
Q: The number is missing from my email. How do I fix it?
A: In the email builder, tick Show how many are left under Stock count. Without it, {{qty}} shows nothing.
Q: Will a shopper get the alert twice for the same item?
A: Only if the stock goes back above the threshold and then drops low again.
Q: I keep stock in more than one location. Which stock counts?
A: Only stock at locations with Use inventory at this location to fulfill online orders turned on, added together. A backup warehouse that doesn't sell online doesn't count.
Q: Can I choose where the low stock message appears?
A: No. It's placed automatically under the product price. If it doesn't show on your theme, contact us.
Q: Why is there no alert or message on a product that keeps selling when out of stock?
A: Products that don't track inventory, or keep selling when out of stock, never run low, so they get neither.