Integrate the Joy Loyalty widget to Hydrogen
Hand-on guide on how to integrate Joy Loyalty seamlessly with Shopify Headless Commerce or Custom Storefront.
Introduction to Joy Loyalty Widget Integration with Hydrogen
The Joy Loyalty Widget Integration is your bridge to creating a seamless, engaging loyalty experience in a Hydrogen-powered Shopify store. It's a comprehensive solution that transforms customer interactions into valuable, rewarding moments.
You can find a complete guide on our npm package here. (opens in a new tab)
Why do you need to integrate
Building your Shopify store with Hydrogen and integrating Joy Loyalty is a game-changer. A loyalty program boosts customer retention, increases average order value, and strengthens brand loyalty. With Joy Loyalty, you can incentivize repeat purchases, stand out from competitors, and gain insights into shopper behavior—all while delivering a seamless experience.
How to enable custom storefront development
Go to Settings > Developers > Enable Custom Storefront development
How to set up your Hydrogen store
If you've already developed your Hydrogen store, you're all set! However, if you haven't started yet or are looking to test a Hydrogen store with Joy Loyalty, don't worry. You can easily set up a quick-start Hydrogen store by following this guide: Getting Started with Hydrogen (opens in a new tab).
If you are not on Shopify Plus plan but still want to test this out with development store first. You can update your .env file with Storefront API key from your Custom App
SESSION_SECRET="foobar"
PUBLIC_STOREFRONT_API_TOKEN="YOUR_KEY"
PUBLIC_STOREFRONT_API_VERSION="2023-04"
PUBLIC_STORE_DOMAIN="YOUR_STORE.myshopify.com"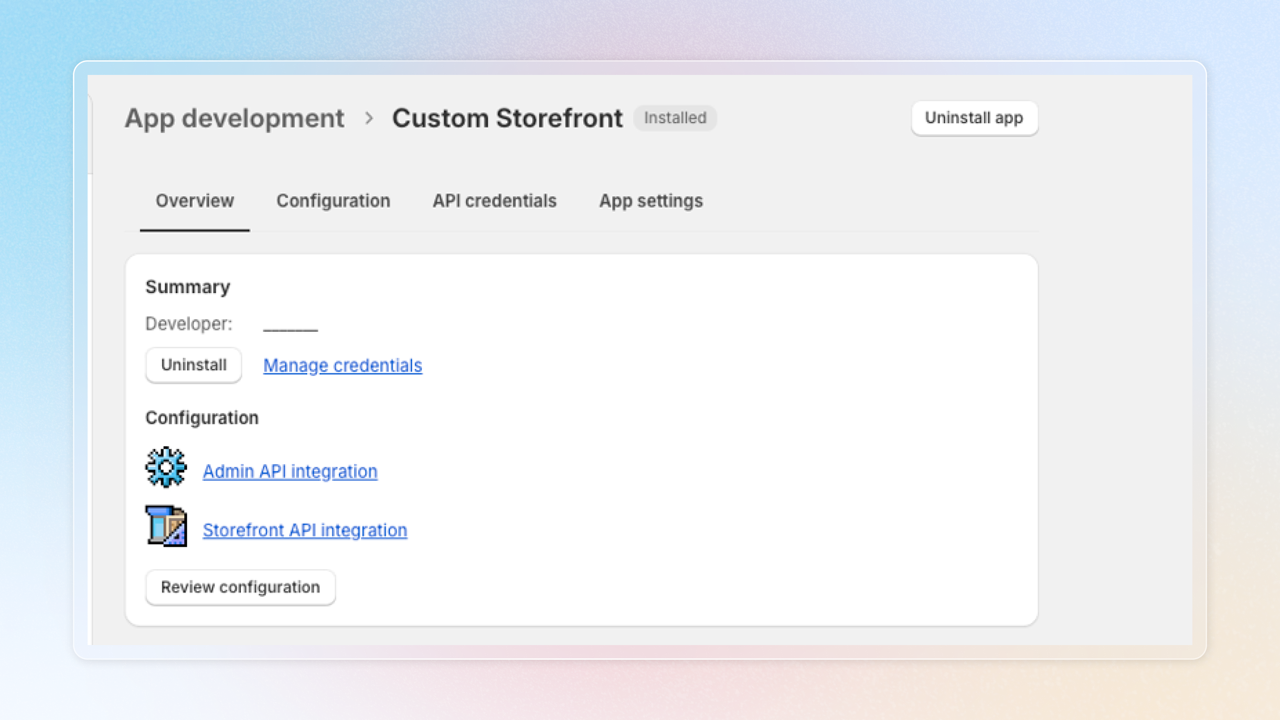
Installation
npm install joyso-hydrogen-sdk
# or
yarn add joyso-hydrogen-sdk
Implementation
1. Load Joy Loyalty Data
In your app/root.jsx or app/layout.jsx loader:
import {getJoyConfigData} from 'joyso-hydrogen-sdk';
import {HEADER_QUERY} from '~/lib/fragments';

/**
 * Load critical data for the page
 */
async function loadCriticalData({context}) {
  const {storefront, session} = context;

  // Load both header and Joy data in parallel
  const [header, joyData] = await Promise.all([
    storefront.query(HEADER_QUERY, {
      cache: storefront.CacheLong(),
      variables: {
        headerMenuHandle: 'main-menu',
      },
    }),
    getJoyConfigData({storefront, session, shopId: 'JOY_APP_ID'})
  ]);

  return {
    header,
    ...joyData,
  };
}

export async function loader({context}) {
  const criticalData = await loadCriticalData({context});

  return {
    ...criticalData,
    // ... other loader data
  };
}
2. Initialize Joy Loyalty in Root Layout
In your app/root.jsx or app/layout.jsx:
import {useJoyLoyalty} from 'joyso-hydrogen-sdk';

export default function App() {
  const data = useLoaderData();

  useJoyLoyalty(data);

  return <Outlet />;
}
3. Add CSP whitelist
Update your entry.server.jsx to include the CSP whitelist for Joy Loyalty:
import {RemixServer} from '@remix-run/react';
import {isbot} from 'isbot';
import {renderToReadableStream} from 'react-dom/server';
import {createContentSecurityPolicy} from '@shopify/hydrogen';

/**
 * @param {Request} request
 * @param {number} responseStatusCode
 * @param {Headers} responseHeaders
 * @param {EntryContext} remixContext
 * @param {AppLoadContext} context
 */
export default async function handleRequest(
  request,
  responseStatusCode,
  responseHeaders,
  remixContext,
  context, // Prefix with _ to indicate it's intentionally unused
) {
  const {nonce, header, NonceProvider} = createContentSecurityPolicy({
    shop: {
      checkoutDomain: context.env.PUBLIC_CHECKOUT_DOMAIN,
      storeDomain: context.env.PUBLIC_STORE_DOMAIN,
    },
    scriptSrc: [
      'self',
      'https://cdn.shopify.com',
      'https://shopify.com',
      'https://www.google-analytics.com',
      'https://www.googletagmanager.com',
      'https://*.joy.avada.io',
      'https://joy.avada.io',
      'https://geoip.apps.getjoy.ai',
      ...(process.env.NODE_ENV !== 'production' ? ['http://localhost:*'] : []),
    ],
    connectSrc: [
      'self',
      'https://cdn.shopify.com',
      'https://shop.app',
      'https://*.joy.avada.io',
      'https://joy.avada.io',
      'https://monorail-edge.shopifysvc.com',
      'https://geoip.apps.getjoy.ai',
      'https://thomas-shopify-production-36.myshopify.com',
      'ws://127.0.0.1:*',
      'ws://localhost:*',
      'ws://*:*',
    ],
    styleSrc: [
      'self',
      'unsafe-inline',
      'https://cdn.shopify.com',
      'https://cdn.builder.io',
      'https://fonts.bunny.net',
      'https://*.joy.avada.io',
    ],
    imgSrc: [
      'self',
      'data:',
      'https://cdn.shopify.com',
      'https://*.joy.avada.io',
      'https://cdnapps.avada.io',
    ],
    frameSrc: [
      'self',
      'https://cdn.shopify.com',
      'https://shop.app',
      'https://*.joy.avada.io',
      'https://geoip.apps.getjoy.ai',
    ],
    fontSrc: ['self', 'https://fonts.bunny.net', 'data:', 'https://*.joy.avada.io'],
    mediaSrc: ['self'],
    objectSrc: ['none'],
    defaultSrc: ['self', 'https://*.joy.avada.io', 'https://joy.avada.io'],
  });

  const body = await renderToReadableStream(
    <NonceProvider>
      <RemixServer context={remixContext} url={request.url} nonce={nonce} />
    </NonceProvider>,
    {
      nonce,
      signal: request.signal,
      onError(error) {
        console.error(error);
        responseStatusCode = 500;
      },
    },
  );

  if (isbot(request.headers.get('user-agent'))) {
    await body.allReady;
  }

  responseHeaders.set('Content-Type', 'text/html');
  responseHeaders.set('Content-Security-Policy', header);

  return new Response(body, {
    headers: responseHeaders,
    status: responseStatusCode,
  });
}

/** @typedef {import('@shopify/remix-oxygen').EntryContext} EntryContext */
/** @typedef {import('@shopify/remix-oxygen').AppLoadContext} AppLoadContext */
After this, you should be able to see the Joy Loyalty widget in your storefront. Besides, the quickstart template of Hydrogen has box-sizing: content-box so the floating button may look a bit weird. You can add this CSS to app. css to fix it. Otherwise, there should be no CSS issues.
*,
*::before,
*::after {
    box-sizing: inherit;
}

html {
    box-sizing: border-box;
    height: 100%;
}
3. Point Calculator
GraphQL Query and Loader
First, update your product page loader and query:
// app/routes/products.$handle.jsx
import {AnalyticsPageType} from '@shopify/hydrogen';

async function loadCriticalData({context, params, request}) {
  const {handle} = params;
  const {storefront} = context;

  if (!handle) {
    throw new Error('Expected product handle to be defined');
  }

  const [{product}] = await Promise.all([
    storefront.query(PRODUCT_QUERY, {
      variables: {handle, selectedOptions: getSelectedProductOptions(request)},
    }),
    // Add other queries here, so that they are loaded in parallel
  ]);

  if (!product?.id) {
    throw new Response(null, {status: 404});
  }

  return {
    product,
    // We need this to detect the page type
    analytics: {
      pageType: AnalyticsPageType.product,
    },
  };
}

const PRODUCT_QUERY = `#graphql
  query Product($handle: String!, $selectedOptions: [SelectedOptionInput!]!) {
    product(handle: $handle) {
      id
      title
      handle
      productType
      tags

      selectedVariant: selectedOrFirstAvailableVariant {
        id
        price {
          amount
        }
        compareAtPrice {
          amount
        }
        selectedOptions {
          name
          value
        }
      }

      # Need to add this if have not had it in the query
      collections(first: 100) {
        nodes {
          title
        }
      }

      # Need to add this if have not had it in the query
      variants(first: 250) {
        nodes {
          ...ProductVariant
          selectedOptions {
            name
            value
          }
          # Required for limitations
          limitation: metafield(namespace: "custom", key: "limitation") {
            value
          }
        }
      }
    }
  }
`;
Component Implementation
In your product page (e.g., app/routes/products.$handle.jsx):
import {useJoyLoyaltyCalculator} from 'joyso-hydrogen-sdk';

export default function Product() {
  // 1. Get product data from loader
  const {product, analytics} = useLoaderData();

  // 2. Initialize the calculator
  useJoyLoyaltyCalculator({
    product,
    analytics,
  });

  // 3. Render product details with calculator
  return (
    <div className="product">
      <ProductImage image={selectedVariant?.image} />
      <div className="product-main">
        <h1>{title}</h1>
        <ProductPrice
          price={selectedVariant?.price}
          compareAtPrice={selectedVariant?.compareAtPrice}
        />
        <br />
        {/* Add the calculator block */}
        <div className="joy-points-calculator__block"></div>
        <br />
        <ProductForm
          productOptions={productOptions}
          selectedVariant={selectedVariant}
        />
      </div>
    </div>
  );
}
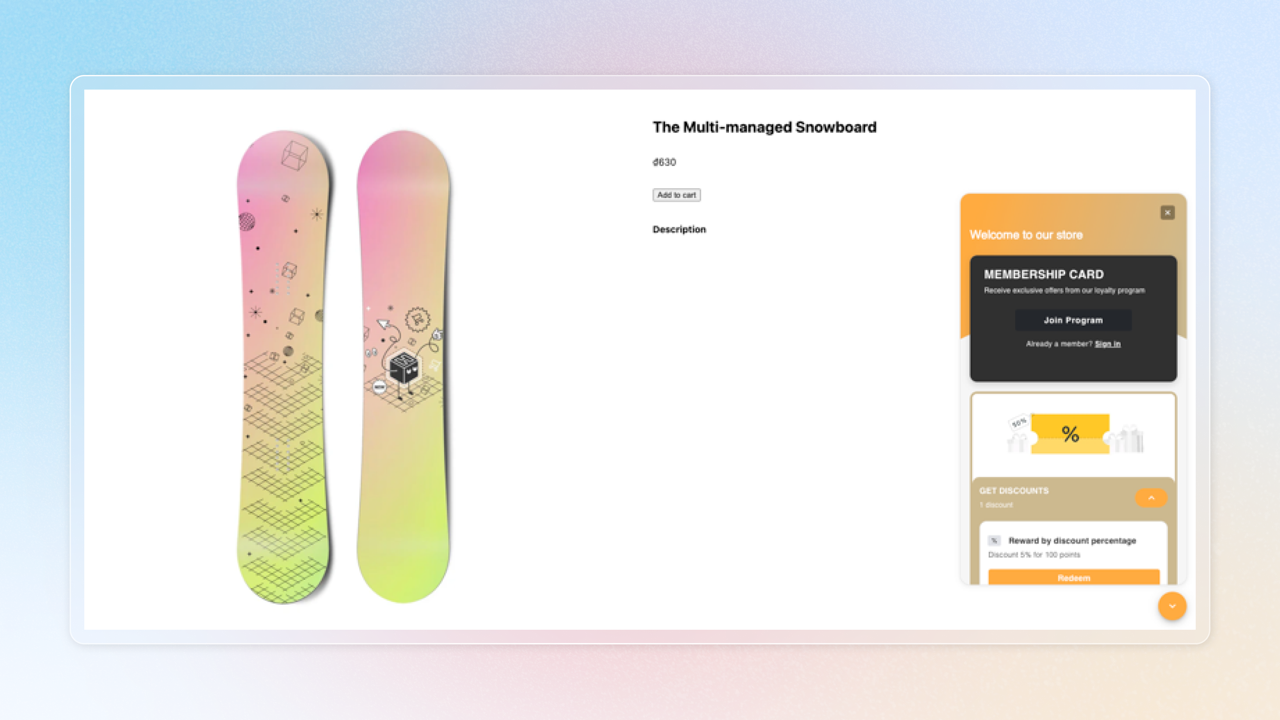
Test the widget
After these are implemented, you will see the widget display on your custom storefront according to your settings. However, you can compare the widgets on the custom storefront and the Online Store channel to make sure both are working properly. With the widget, you can earn points, redeem points, and use coupons seamlessly on your store.
Wrap up
Our app has other features such as Joy Point Calculator, Joy Rewards Page, etc. If you want to build your own Rewards page using Hydrogen, we will have another post showing how to implement this Rewards page using our Public API and JavaScript SDK.
We hope that this guide provides you with the first step on how to integrate the Joy Loyalty Program widget into your Headless Commerce store.